
The costs of exposing customer data
In 2023, the European Union set a record for fines imposed for violating the General Data Protection Regulation (GDPR) and companies are taking note. One of the greatest risks to any company is accidentally exposing customer data, or personally identifiable information (PII). This is particularly true for highly regulated industries such as finance and health care, which manage large amounts of PII data. Increasingly, hackers are targeting PII due to its value on the dark web. The cyber security company Imperva recently reported that PII was specifically targeted in more than 42% of attacks, by far the most common data type target and more than 7x higher than passwords.
Even without penalties and fines, data breaches are expensive. The most recent annual “Cost of a Data Breach Report” conducted by Ponemon Institute and sponsored and published by IBM Security, revealed that the cost of a breach averaged $4.45 million USD in 2023, an all-time high. And those numbers don’t include the less easily calculated cost of the loss of customer confidence.
One of the report’s recommendations is that “companies should seek data security and compliance technologies that work on all platforms, allowing them to protect data as it moves across databases, applications and services deployed across hybrid cloud environments.”
However, many organizations don’t follow this best practice because identifying sensitive data in flight and removing it can be hard to do.
Chronosphere Telemetry Pipeline, from the creators of Fluent Bit and Calyptia, makes it easy.
Telemetry Pipeline streamlines data collection, transformation, and routing from any source to any destination. It plugs into your existing observability and security information and event management (SIEM) solutions, and it has powerful data processing and filtering capabilities that allow you to identify sensitive data and redact, remove, or hash it midstream before it is routed to its final destination for storage and analysis.
Let’s see how it works.
Getting started
For the purposes of this blog, we’ll skip the process of setting up the initial telemetry pipeline, but if you are new to telemetry pipelines you may want to check out the docs.
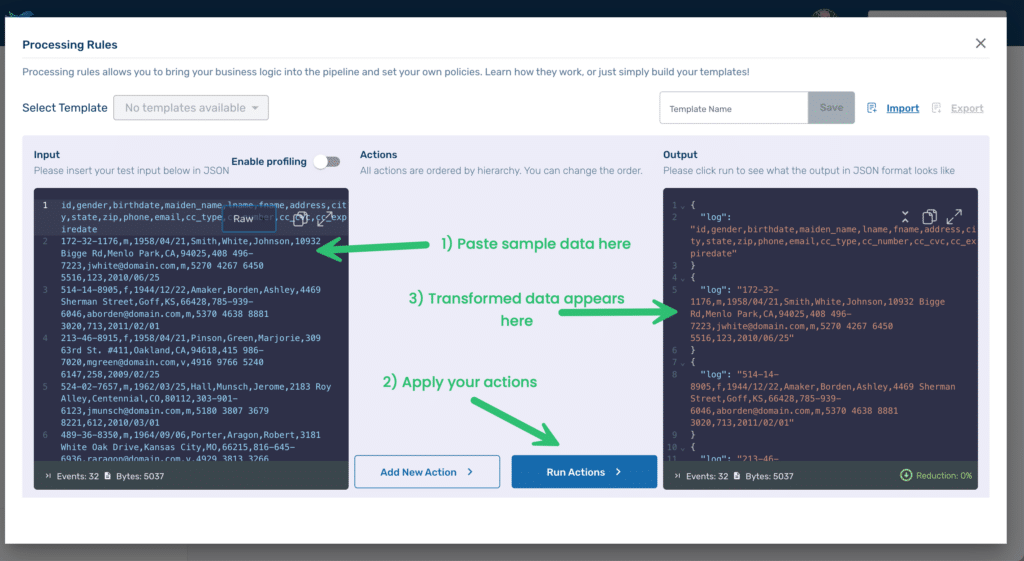
We’ll be using the Processing Rules Playground feature within Telemetry Pipeline. The playground lets you experiment with processing rule modifications nondestructively. You can even import samples of your actual data so that you can see exactly the impact of any modifications before applying them to your actual pipeline.
For this post, we’ll use a sample dataset with fake PII from the piicatcher project. Copy and paste the data from the CSV file into the Input area (see #1 below), replacing the dummy text already there. Before we apply any processing rules, press Run Actions(2) to see the results in the Output area. You’ll notice immediately that Telemetry Pipeline, by default, formats its output as JSON (3), with each line of our CSV file as the value of a key called log.
Prepping the data
To make it easier to identify and manipulate the PII within our data, we will need to apply some processing rules to create structured data.
We must first decode our CSV file into a JSON format with key-value pairs for each data field. Click Add New Action and select the Decode CSV from the dropdown menu. In the configuration screen, keep the default settings for both the Source Key and the Destination Key (log and decoded_csv respectively). Since our CSV file contains a header, ensure that the Parse header option is checked. Then paste the first row of our CSV file — which contains the headers — into the area labeled Preset header for the parsed CSV stream.
id,gender,birthdate,maiden_name,lname,fname,address,city,state,zip,phone,email,cc_type,cc_number,cc_cvc,cc_expiredate
Press Apply and then Run Actions to see the impact of the rule on the output. It should look something like this:
{
  "decoded_csv": {
    "cc_type": "m",
    "cc_number": "5270 4267 6450 5516",
    "address": "10932 Bigge Rd",
    "gender": "m",
    "cc_cvc": "123",
    "lname": "White",
    "cc_expiredate": "2010/06/25",
    "phone": "408 496-7223",
    "email": "[email protected]",
    "zip": "94025",
    "city": "Menlo Park",
    "maiden_name": "Smith",
    "state": "CA",
    "birthdate": "1958/04/21",
    "fname": "Johnson",
    "id": "172-32-1176"
  },
  "log": "172-32-1176,m,1958/04/21,Smith,White,Johnson,10932 Bigge Rd,Menlo Park,CA,94025,408 496-7223,[email protected],m,5270 4267 6450 5516,123,2010/06/25"
}
{
  "decoded_csv": {
    "cc_type": "m",
    "cc_number": "5370 4638 8881 3020",
    "address": "4469 Sherman Street",
    "gender": "f",
    "cc_cvc": "713",
    "lname": "Borden",
    "cc_expiredate": "2011/02/01",
    "phone": "785-939-6046",
    "email": "[email protected]",
    "zip": "66428",
    "city": "Goff",
    "maiden_name": "Amaker",
    "state": "KS",
    "birthdate": "1944/12/22",
    "fname": "Ashley",
    "id": "514-14-8905"
  },
  "log": "514-14-8905,f,1944/12/22,Amaker,Borden,Ashley,4469 Sherman Street,Goff,KS,66428,785-939-6046,[email protected],m,5370 4638 8881 3020,713,2011/02/01"
}
...
Two key-value pairs now represent each line of our original CSV file. The log key value contains the full line of the CSV file, while the decoded_csv key is an array where each key is an item from the header row of the CSV file, and the value is the appropriate item from the line.
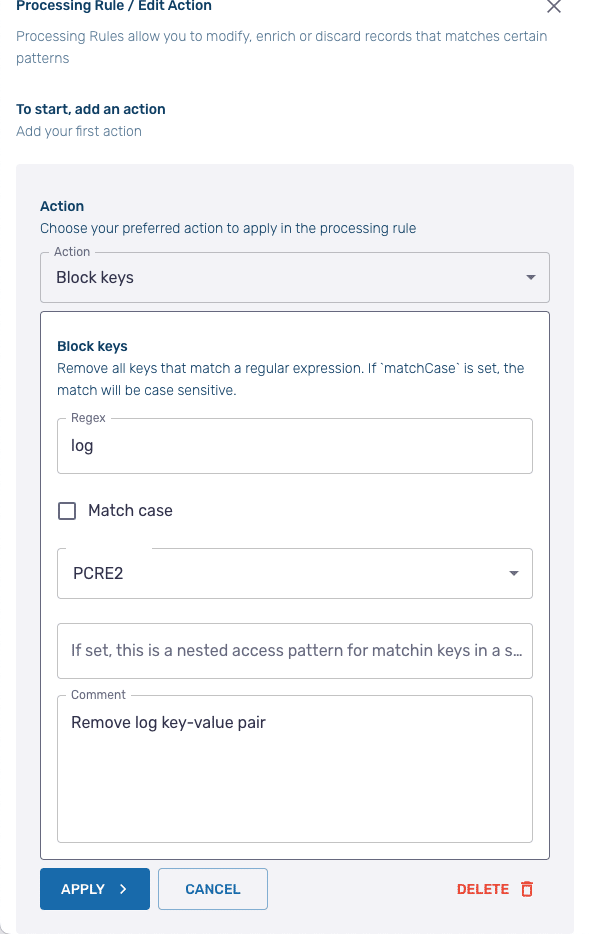
Next, we need to remove the log key-value pair. To do so, add a new rule and select Block Keys. On the configuration screen, in the Regex field, just enter log then click Apply.
After you Run Actions, the log key-value pair should now be removed from the output.
We have one final transformation to apply to our sample data before we can start manipulating the PII within it – flattening the array.
Add a new action and select, Flatten subrecord. On the configuration screen, for the Key field enter decoded_csv. Keep the default settings for the rest of the fields.
After running the test, the output shows that our data now appears as standard key-value pairs.
{
  "address": "10932 Bigge Rd",
  "gender": "m",
  "cc_number": "5270 4267 6450 5516",
  "maiden_name": "Smith",
  "cc_cvc": "123",
  "lname": "White",
  "cc_expiredate": "2010/06/25",
  "id": "172-32-1176",
  "email": "[email protected]",
  "zip": "94025",
  "cc_type": "m",
  "state": "CA",
  "city": "Menlo Park",
  "phone": "408 496-7223",
  "fname": "Johnson",
  "birthdate": "1958/04/21"
}
{
  "address": "4469 Sherman Street",
  "gender": "f",
  "cc_number": "5370 4638 8881 3020",
  "maiden_name": "Amaker",
  "cc_cvc": "713",
  "lname": "Borden",
  "cc_expiredate": "2011/02/01",
  "id": "514-14-8905",
  "email": "[email protected]",
  "zip": "66428",
  "cc_type": "m",
  "state": "KS",
  "city": "Goff",
  "phone": "785-939-6046",
  "fname": "Ashley",
  "birthdate": "1944/12/22"
}
...
Note: you may find that the order of the key-value pairs has shifted from that in the CSV file.
How to redact, remove, and hash PII data
Now that Telemetry Pipeline has transformed the CSV data into JSON key-value pairs, we can start identifying and removing PII. There are multiple approaches.
Redacting birthdates
We will begin with redaction. Add a new action, and select Redact/mask value as the action. On the configuration screen, enter birthdate in the Key fields and \b\d{4}/\d{2}/\d{2}\b in the Regex field. You can leave Replacement characters with the default asterisk value or pick something else.
After we apply the new rule and run the actions our output now looks like this:
{
  "address": "10932 Bigge Rd",
  "phone": "408 496-7223",
  "gender": "m",
  "city": "Menlo Park",
  "maiden_name": "Smith",
  "fname": "Johnson",
  "cc_number": "5270 4267 6450 5516",
  "cc_cvc": "123",
  "email": "[email protected]",
  "cc_expiredate": "2010/06/25",
  "id": "172-32-1176",
  "lname": "White",
  "zip": "94025",
  "cc_type": "m",
  "state": "CA",
  "birthdate": "**********"
}
{
  "address": "4469 Sherman Street",
  "phone": "785-939-6046",
  "gender": "f",
  "city": "Goff",
  "maiden_name": "Amaker",
  "fname": "Ashley",
  "cc_number": "5370 4638 8881 3020",
  "cc_cvc": "713",
  "email": "[email protected]",
  "cc_expiredate": "2011/02/01",
  "id": "514-14-8905",
  "lname": "Borden",
  "zip": "66428",
  "cc_type": "m",
  "state": "KS",
  "birthdate": "**********"
}
...
Removing credit card numbers
Another option is to remove the data entirely, which has the added advantage of reducing storage costs. Add a new action and select Delete key. For the Key, enter cc_number. After we apply the new rule and run the actions, we see that the credit card key-value pair no longer appears in the output.
Hashing social security numbers
The final method we will cover is hashing the sensitive data. Add a new action and select Hash key as the action. In the configuration screen, set the Source key to id . Leave the Destination key blank. Then select SHA256 as the hash method and hexidecimal as the format. The MD5 hash algorithm is also supported as well as binary and Base64 formats.
Once again, apply the new rule and run the actions to see the results. A new key-value pair has been added with the key being id_sha256 and the value being the hased string.
Warning: The Hash key does not remove the original key-value pair. You should apply an additional rule Delete key action following the Hash key action to remove the data.
Our Processing Rules Playground screen now looks like this:
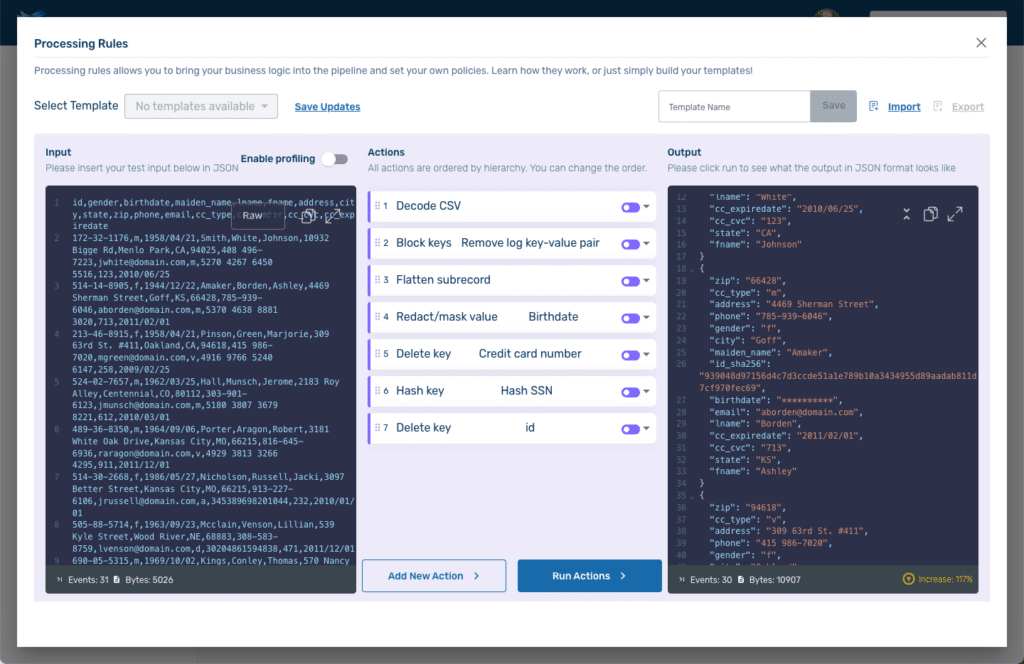
Because we were using the playground our actual pipelines were unaffected. If we wanted to use these rules on an actual pipeline, we could export them and then import them when configuring the rules for an active pipeline. They can also be saved as a template and applied that way.
Manning Book: Fluent Bit with Kubernetes
Master log forwarding in Kubernetes. Download Fluent Bit with Kubernetes now!